We do not recommend online lecturing through the zoom. The Lecturer can record the lecture using a video recording application and upload it to the Faculty LMS. Follow the following technical guidelines when you conduct lectures online.
- Record your lectures using a video recorder. If you use Microsoft Windows, you can use the default Windows Camera and QuickTime player gives apple users to record videos from the web camera.
- Edit your videos by removing spaces and split those into small clips around 20-30 minutes. You can use open-source video editing tools such as OpenShot, Shotcut to edit your videos.
- Compress your videos before uploading to the LMS, using a video compression tool and keep the size of the video as small as possible.
- After uploading, the lecturer can provide a time period for students to download and watch it. Meanwhile, the lecturer can start a discussion forum to ask students questions.
- Then, if it is necessary, the lecturer can use the Zoom or any other video conference facility to discuss those issues with students.
- Announce the discussions on the LMS and ask students to post questions before the online discussions. If the students cannot attend the video conference, they could also ask questions on the LMS forum.
- All students will not attend the online discussion. You can record the video conference and upload it again to the LMS.
How to Compress your eLearning Videos using VLC Media Player
When you record lectures/presentations based on your courses, it is important to check their sizes and make it smaller as much as possible before you upload them to LMS/Web. The raw video files such as windows mov files are large and it is better not to upload those files. The recommended format of the file is MP4 video format and it is better to convert your file before you upload them. There are several tools and VLC media player could also be used to convert any video file to standard MP4 video format. Follow the following guidelines when you want to convert them to MP4 format.
- First, Download, install the VLC Media Player on your PC and open it.
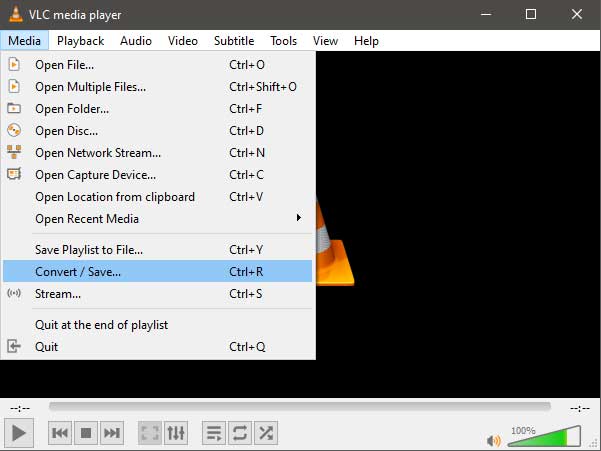
videolan.org - Then, go to Menu and click on Media- > Convert/save.

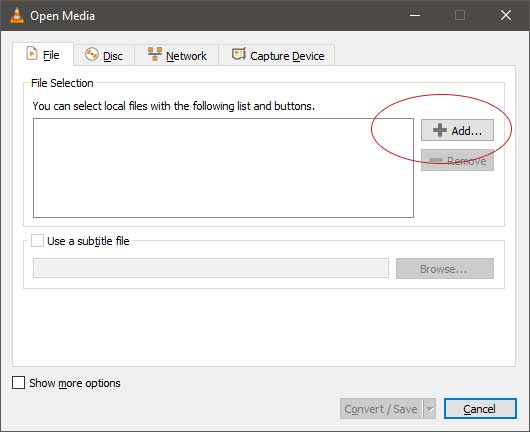
- After that, add video/s you need to convert and click on the “Convert/Save” button.

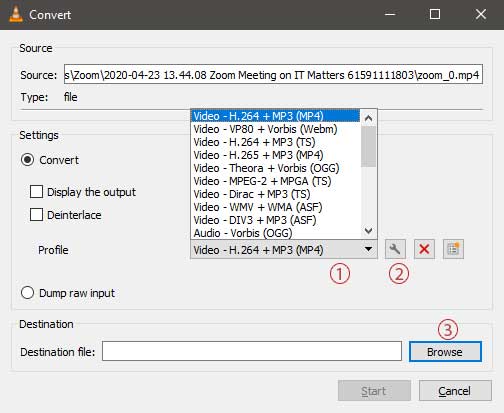
- Select the type of profile you want to convert the video (1). Video H.264 + MP3 (MP4) is the most commonly used. If you wish to change additional settings, click on the settings button (2) and change the options. Then, select the destination file name that you need to save your video (3).

- Then, press the Start button and after a few minutes, your newly compressed video will be ready to upload on your LMS. We recommend you store original, non-compressed copies of your videos on an external hard drive in case you need to use them again at a later stage. At the same time, we recommend you to split your video file into 20-30 minutes segments or to create videos with 20-30 minutes of the session. It is easier to download several small files rather than one single large file.